Golang中map增删改查操作的实现原理
本文内容主要引用自深入解析Golang的map设计
上一篇文章主要介绍了map的基本原理与创建map是如何实现的,这一篇文章让我们学习map增删改查操作的实现原理
查找key 对于map的元素查找,其源码实现如下:
1 2 3 4 5 6 7 8 9 10 11 12 13 14 15 16 17 18 19 20 21 22 23 24 25 26 27 28 29 30 31 32 33 34 35 36 37 38 39 40 41 42 43 44 45 46 47 48 49 50 51 52 53 54 55 56 57 58 59 60 61 62 63 64 65 66 67 68 69 70 71 72 73 74 75 76 77 78 79 80 81 func mapaccess1 (t *maptype, h *hmap, key unsafe.Pointer) if raceenabled && h != nil {if msanenabled && h != nil {if h == nil || h.count == 0 {if t.hashMightPanic() {0 ) return unsafe.Pointer(&zeroVal[0 ])if h.flags&hashWriting != 0 {"concurrent map read and map write" )uintptr (h.hash0))uintptr (t.bucketsize)))if c := h.oldbuckets; c != nil {if !h.sameSizeGrow() {1 uintptr (t.bucketsize)))if !evacuated(oldb) {for ; b != nil ; b = b.overflow(t) {for i := uintptr (0 ); i < bucketCnt; i++ {if b.tophash[i] != top {if b.tophash[i] == emptyRest {break bucketloopcontinue uintptr (t.keysize))if t.indirectkey() {if t.key.equal(key, k) {uintptr (t.keysize)+i*uintptr (t.elemsize))if t.indirectelem() {return ereturn unsafe.Pointer(&zeroVal[0 ])
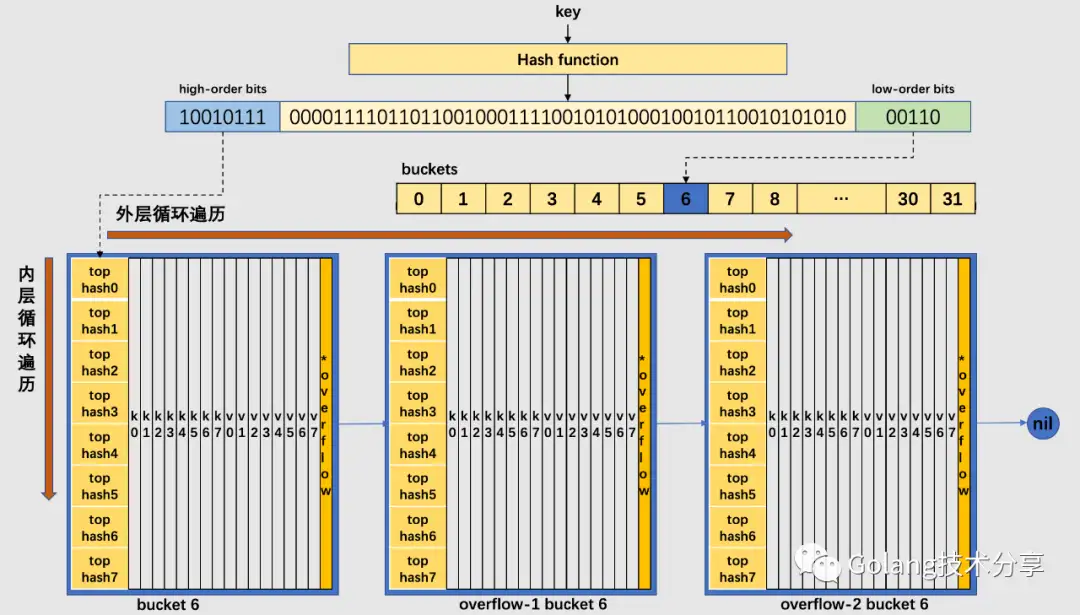
以下是mapaccess1的查找过程图解
map的元素查找,对应go代码有两种形式
1
2
3
4
形式一的代码实现,就是上述的mapaccess1方法。此外,在源码中还有个mapaccess2方法,它的函数签名如下。
1 func mapaccess2 (t *maptype, h *hmap, key unsafe.Pointer) bool ) {}
与mapaccess1相比,mapaccess2多了一个bool类型的返回值,它代表的是是否在map中找到了对应的key。因为和mapaccess1基本一致,所以详细代码就不再贴出。
同时,源码中还有mapaccessK方法,它的函数签名如下。
1 func mapaccessK (t *maptype, h *hmap, key unsafe.Pointer)
与mapaccess1相比,mapaccessK同时返回了key和value,其代码逻辑也一致。
赋值key 对于写入key的逻辑,其源码实现如下
1
2
3
4
5
6
7
8
9
10
11
12
13
14
15
16
17
18
19
20
21
22
23
24
25
26
27
28
29
30
31
32
33
34
35
36
37
38
39
40
41
42
43
44
45
46
47
48
49
50
51
52
53
54
55
56
57
58
59
60
61
62
63
64
65
66
67
68
69
70
71
72
73
74
75
76
77
78
79
80
81
82
83
84
85
86
87
88
89
90
91
92
93
94
95
96
97
98
99
100
101
102
103
104
105
106
107
108
109
110
111
112
113
114
115
116
117
118
119
120
121
122
123
124
125
126
127
128
129
130
131
132
133
134
135
136
137
138
139
140
141
142
143
144
145
146
147
148
149
150
151
152
153
func mapassign (t *maptype, h *hmap, key unsafe.Pointer) if h == nil {panic (plainError("assignment to entry in nil map" ))if raceenabled {if msanenabled {if h.flags&hashWriting != 0 {"concurrent map writes" )uintptr (h.hash0))if h.buckets == nil {if h.growing() {uintptr (h.buckets) + bucket*uintptr (t.bucketsize)))var inserti *uint8 var insertk unsafe.Pointervar elem unsafe.Pointerfor {for i := uintptr (0 ); i < bucketCnt; i++ {if b.tophash[i] != top {if isEmpty(b.tophash[i]) && inserti == nil {uintptr (t.keysize))uintptr (t.keysize)+i*uintptr (t.elemsize))if b.tophash[i] == emptyRest {break bucketloopcontinue uintptr (t.keysize))if t.indirectkey() {if !t.key.equal(key, k) {continue if t.needkeyupdate() {uintptr (t.keysize)+i*uintptr (t.elemsize))goto doneif ovf == nil {break if !h.growing() && (overLoadFactor(h.count+1 , h.B) || tooManyOverflowBuckets(h.noverflow, h.B)) {goto again if inserti == nil {0 ]uintptr (t.keysize))if t.indirectkey() {if t.indirectelem() {if h.flags&hashWriting == 0 {"concurrent map writes" )if t.indirectelem() {return elem
通过对mapassign的代码分析之后,发现该函数并没有将插入key对应的value写入对应的内存,而是返回了value应该插入的内存地址。为了弄清楚value写入内存的操作是发生在什么时候,分析如下map.go代码。
1
2
3
4
5
6
7
8
package mainfunc main () make (map [int ]int )for i := 0 ; i < 100 ; i++ {666
m[i] = 666对应的汇编代码
1
2
3
4
5
6
7
8
9
10
11
$ go tool compile -S map.go"" ..autotmp_2+184(SP), DX$666 , (AX) // 把 666 放入该地址中
赋值的最后一步实际上是编译器额外生成的汇编指令来完成的,可见靠 runtime 有些工作是没有做完的。所以,在go中,编译器和 runtime 配合,才能完成一些复杂的工作。同时说明,在平时学习go的源代码实现时,必要时还需要看一些汇编代码。
删除key 根据 key 类型的不同,删除操作会被优化成更具体的函数:
key 类型
删除
uint32
mapdelete_fast32(t *maptype, h *hmap, key uint32)
uint64
mapdelete_fast64(t *maptype, h *hmap, key uint64)
string
mapdelete_faststr(t *maptype, h *hmap, ky string)
当然,我们只关心 mapdelete 函数。它首先会检查 h.flags 标志,如果发现写标位是 1,直接 panic,因为这表明有其他协程同时在进行写操作。
计算 key 的哈希,找到落入的 bucket。检查此 map 如果正在扩容的过程中,直接触发一次搬迁操作。
删除操作同样是两层循环,核心还是找到 key 的具体位置。寻找过程都是类似的,在 bucket 中挨个 cell 寻找。
找到对应位置后,对 key 或者 value 进行“清零”操作:
src/runtime/map.go的mapdelete方法相关逻辑。
1 2 3 4 5 6 7 8 9 10 11 12 13 if t.indirectkey {nil else {if t.indirectvalue {nil else {
最后,将 count 值减 1,将对应位置的 tophash 值置成 Empty。
遍历map 结论:迭代 map 的结果是无序的
1
2
3
4
5
6
7
m := make (map [int ]int )for i := 0 ; i < 10 ; i++ {for k, v := range m {
运行以上代码,我们会发现每次输出顺序都是不同的。
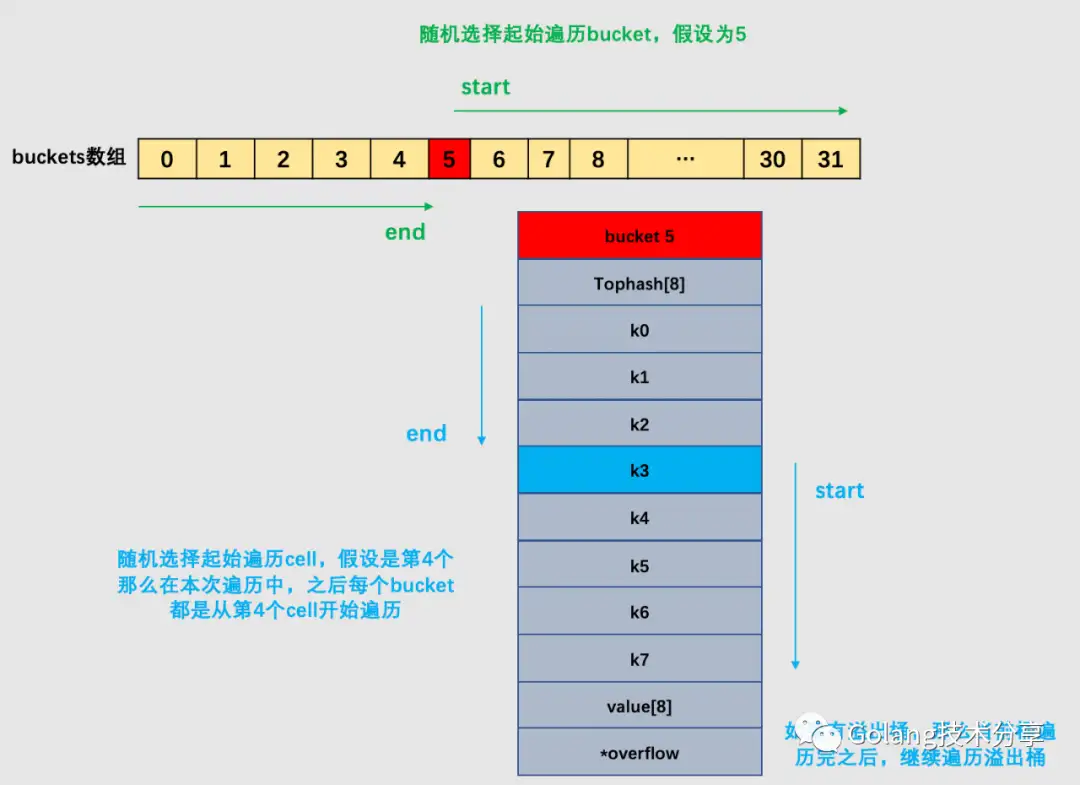
map遍历的过程,是按序遍历bucket,同时按需遍历bucket中和其overflow bucket中的cell。但是map在扩容后,会发生key的搬迁,这造成原来落在一个bucket中的key,搬迁后,有可能会落到其他bucket中了,从这个角度看,遍历map的结果就不可能是按照原来的顺序了(详见下文的map扩容内容)。
但其实,go为了保证遍历map的结果是无序的,做了以下事情:map在遍历时,并不是从固定的0号bucket开始遍历的,每次遍历,都会从一个随机值序号的bucket ,再从其中随机的cell 开始遍历。然后再按照桶序遍历下去,直到回到起始桶结束。
上图的例子,是遍历一个处于未扩容状态的map。如果map正处于扩容状态时,需要先判断当前遍历bucket是否已经完成搬迁,如果数据还在老的bucket,那么就去老bucket中拿数据。
注意:在下文中会讲解到增量扩容和等量扩容。当发生了增量扩容时,一个老的bucket数据可能会分裂到两个不同的bucket中去,那么此时,如果需要从老的bucket中遍历数据,例如1号,则不能将老1号bucket中的数据全部取出,仅仅只能取出老 1 号 bucket 中那些在裂变之后,分配到新 1 号 bucket 中的那些 key(这个内容,请读者看完下文map扩容的讲解之后再回头理解)。
详细内容可自行查看源码src/runtime/map.go的mapiterinit()和mapiternext()方法逻辑。
这里注释一下mapiterinit()中随机保证的关键代码
1 2 3 4 5 6 7 8 9 uintptr (fastrand())if h.B > 31 -bucketCntBits {uintptr (fastrand()) << 31 uint8 (r >> h.B & (bucketCnt - 1 ))
map扩容 装载因子是决定哈希表是否进行扩容的关键指标。在go的map扩容中,除了装载因子 会决定是否需要扩容,溢出桶的数量 也是扩容的另一关键指标。
为了保证访问效率,当map将要添加、修改或删除key时,都会检查是否需要扩容,扩容实际上是以空间换时间的手段。在之前源码mapassign中,其实已经注释map扩容条件,主要是两点:
判断已经达到装载因子的临界点,即元素个数 >= 桶(bucket)总数 * 6.5,这时候说明大部分的桶可能都快满了(即平均每个桶存储的键值对达到6.5个),如果插入新元素,有大概率需要挂在溢出桶(overflow bucket)上。
1
2
3
func overLoadFactor (count int , B uint8 ) bool {return count > bucketCnt && uintptr (count) > loadFactorNum*(bucketShift(B)/loadFactorDen)
判断溢出桶是否太多,当桶总数 < 2 ^ 15 时,如果溢出桶总数 >= 桶总数,则认为溢出桶过多。当桶总数 >= 2 ^ 15 时,直接与 2 ^ 15 比较,当溢出桶总数 >= 2 ^ 15 时,即认为溢出桶太多了。
1
2
3
4
5
6
func tooManyOverflowBuckets (noverflow uint16 , B uint8 ) bool {if B > 15 {15 return noverflow >= uint16 (1 )<<(B&15 )
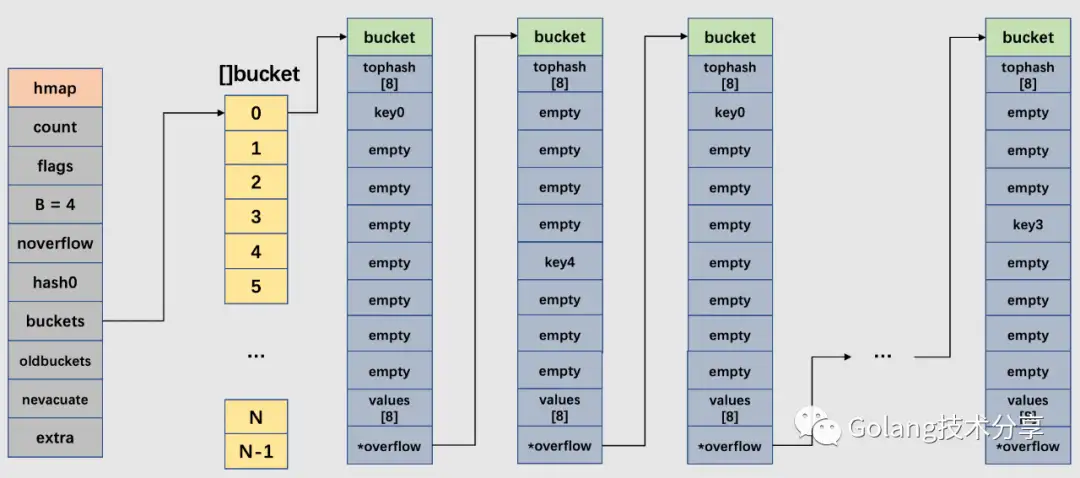
对于第2点,其实算是对第 1 点的补充。因为在装载因子比较小的情况下,有可能 map 的查找和插入效率也很低,而第 1 点识别不出来这种情况。表面现象就是计算装载因子的分子比较小,即 map 里元素总数少,但是桶数量多(真实分配的桶数量多,包括大量的溢出桶)。
在某些场景下,比如不断的增删,这样会造成overflow的bucket数量增多,但负载因子又不高,未达不到第 1 点的临界值,就不能触发扩容来缓解这种情况。这样会造成桶的使用率不高,值存储得比较稀疏,查找插入效率会变得非常低,因此有了第 2 点判断指标。这就像是一座空城,房子很多,但是住户很少,都分散了,找起人来很困难。
如上图所示,由于对map的不断增删,以0号bucket为例,该桶链中就造成了大量的稀疏桶。
两种情况官方采用了不同的解决方案
针对 1,将 B + 1,新建一个buckets数组,新的buckets大小是原来的2倍,然后旧buckets数据搬迁到新的buckets。该方法我们称之为增量扩容 。
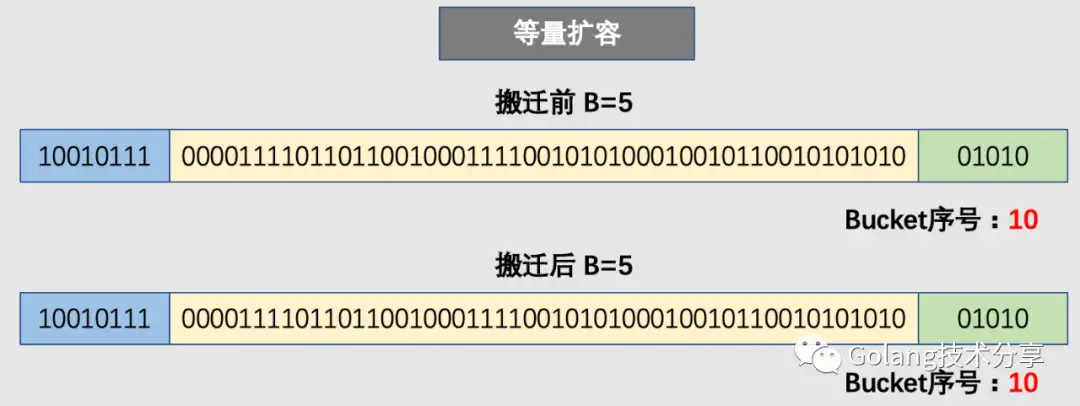
针对 2,并不扩大容量,buckets数量维持不变,重新做一遍类似增量扩容的搬迁动作,把松散的键值对重新排列一次,以使bucket的使用率更高,进而保证更快的存取。该方法我们称之为等量扩容 。
对于 2 的解决方案,其实存在一个极端的情况:如果插入 map 的 key 哈希都一样,那么它们就会落到同一个 bucket 里,超过 8 个就会产生 overflow bucket,结果也会造成 overflow bucket 数过多。移动元素其实解决不了问题,因为这时整个哈希表已经退化成了一个链表,操作效率变成了 O(n)。但 Go 的每一个 map 都会在初始化阶段的 makemap时定一个随机的哈希种子,所以要构造这种冲突是没那么容易的。
在源码中,和扩容相关的主要是hashGrow()函数与growWork()函数。hashGrow() 函数实际上并没有真正地“搬迁”,它只是分配好了新的 buckets,并将老的 buckets 挂到了 oldbuckets 字段上。真正搬迁 buckets 的动作在 growWork() 函数中,而调用 growWork() 函数的动作是在mapassign() 和 mapdelete() 函数中。也就是插入(包括修改)、删除 key 的时候,都会尝试进行搬迁 buckets 的工作。它们会先检查 oldbuckets 是否搬迁完毕(检查 oldbuckets 是否为 nil),再决定是否进行搬迁工作。
hashGrow()函数
1
2
3
4
5
6
7
8
9
10
11
12
13
14
15
16
17
18
19
20
21
22
23
24
25
26
27
28
29
30
31
32
33
34
35
36
37
38
39
40
41
42
func hashGrow (t *maptype, h *hmap) uint8 (1 )if !overLoadFactor(h.count+1 , h.B) {0 nil )if h.flags&iterator != 0 {0 0 if h.extra != nil && h.extra.overflow != nil {if h.extra.oldoverflow != nil {"oldoverflow is not nil" )nil if nextOverflow != nil {if h.extra == nil {new (mapextra)
growWork()函数
1
2
3
4
5
6
7
8
9
10
func growWork (t *maptype, h *hmap, bucket uintptr ) if h.growing() {
从growWork()函数可以知道,搬迁的核心逻辑是evacuate()函数。这里读者可以思考一个问题:为什么每次至多搬迁2个bucket?这其实是一种性能考量,如果map存储了数以亿计的key-value,一次性搬迁将会造成比较大的延时,因此才采用逐步搬迁策略。
在讲解该逻辑之前,需要读者先理解以下两个知识点。
前面讲到,增量扩容(条件1)和等量扩容(条件2)都需要进行bucket的搬迁工作。对于等量扩容而言,由于buckets的数量不变,因此可以按照序号来搬迁。例如老的的0号bucket,仍然搬至新的0号bucket中。
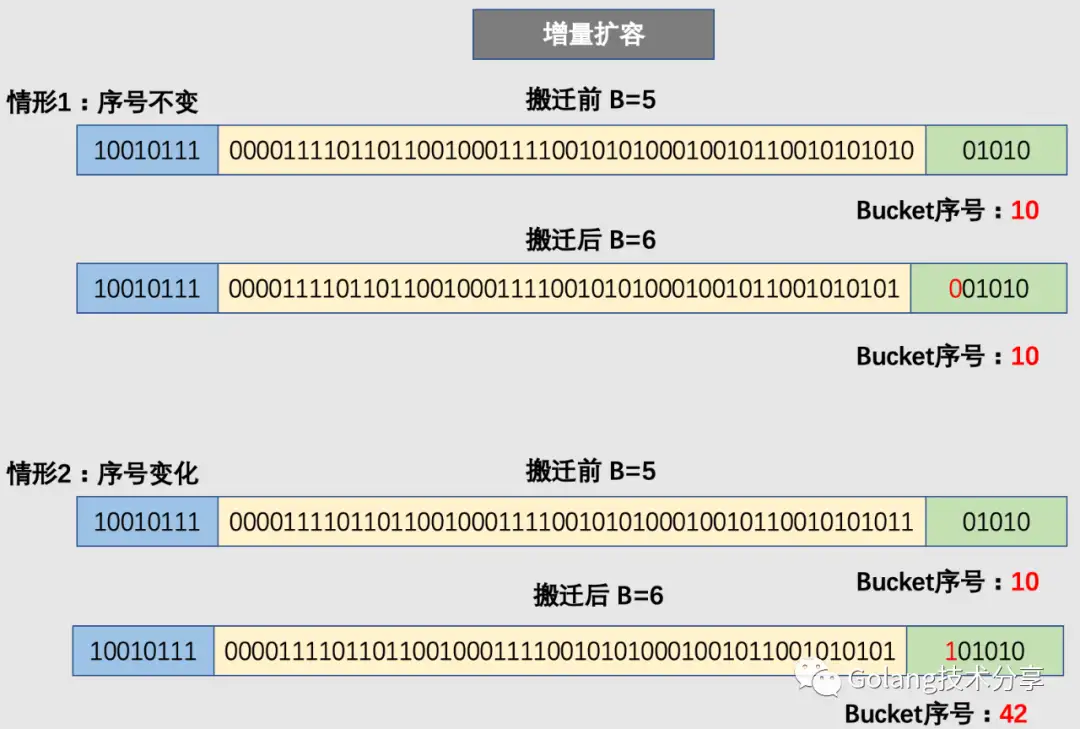
但是,对于增量扩容而言,就会有所不同。例如原来的B=5,那么增量扩容时,B就会变成6。那么决定key值落入哪个bucket的低位哈希值就会发生变化(从取5位变为取6位),取新的低位hash值得过程称为rehash。
因此,在增量扩容中,某个 key 在搬迁前后 bucket 序号可能和原来相等,也可能是相比原来加上 2^B(原来的 B 值),取决于低 hash 值第倒数第B+1位是 0 还是 1。
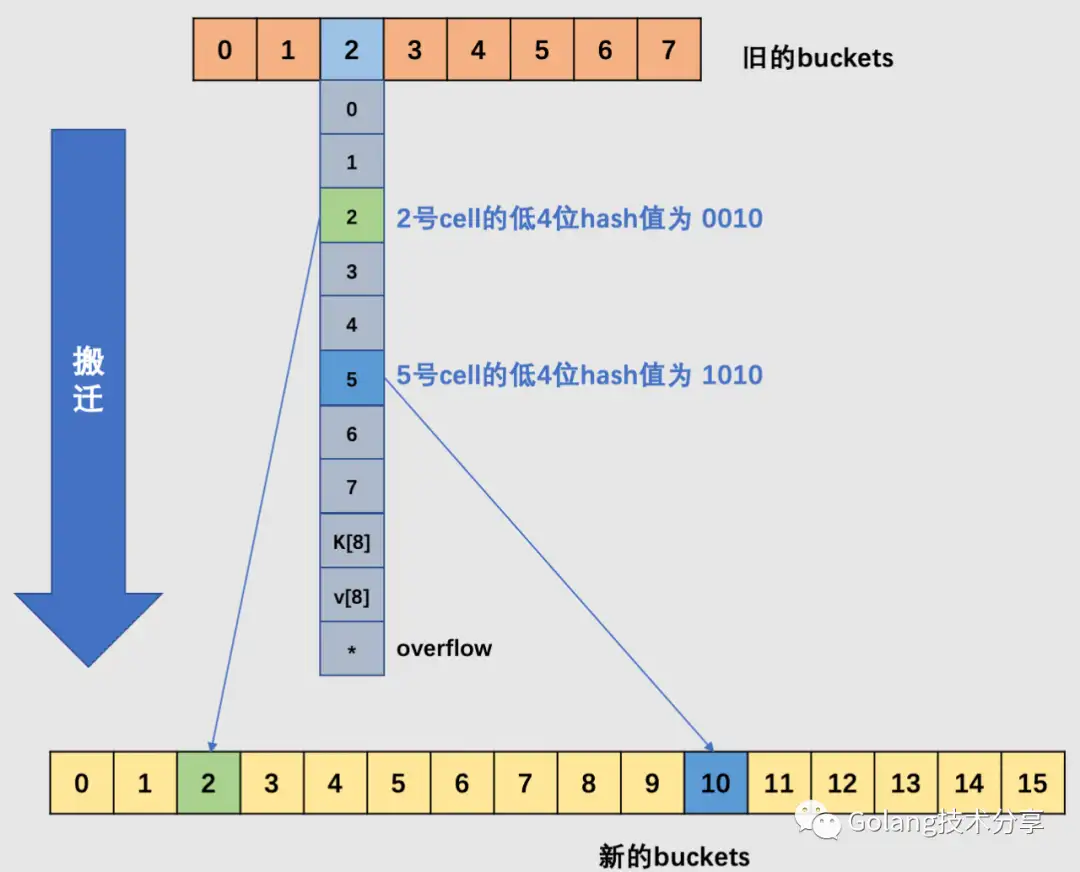
如上图所示,当原始的B = 3时,旧buckets数组长度为8,在编号为2的bucket中,其2号cell和5号cell,它们的低3位哈希值相同(不相同的话,也就不会落在同一个桶中了),但是它们的低4位分别是0010、1010。当发生了增量扩容,2号就会被搬迁到新buckets数组的2号bucket中去,5号被搬迁到新buckets数组的10号bucket中去,它们的桶号差距是2的3次方。
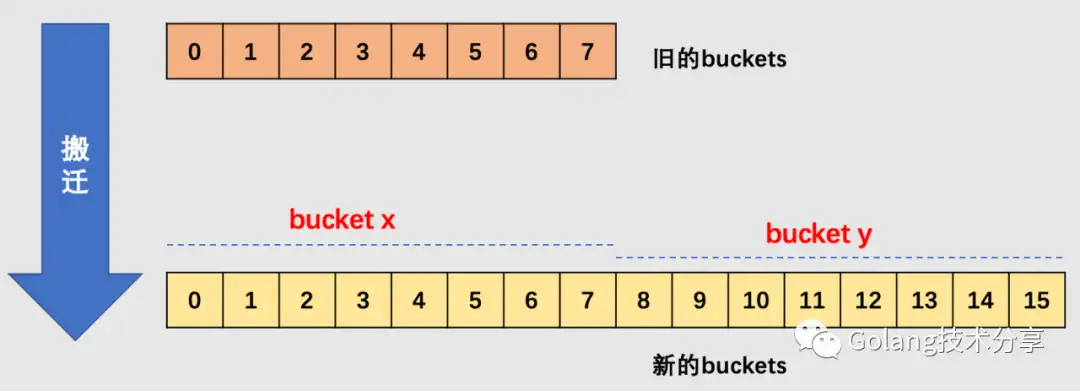
在源码中,有bucket x 和bucket y的概念,其实就是增量扩容到原来的 2 倍,桶的数量是原来的 2 倍,前一半桶被称为bucket x,后一半桶被称为bucket y。一个 bucket 中的 key 可能会分裂到两个桶中去,分别位于bucket x的桶,或bucket y中的桶。所以在搬迁一个 cell 之前,需要知道这个 cell 中的 key 是落到哪个区间(而对于同一个桶而言,搬迁到bucket x和bucket y桶序号的差别是老的buckets大小,即2^old_B)。
这里留一个问题:为什么确定key落在哪个区间很重要?
确定了要搬迁到的目标 bucket 后,搬迁操作就比较好进行了。将源 key/value 值 copy 到目的地相应的位置。设置 key 在原始 buckets 的 tophash 为 evacuatedX 或是 evacuatedY,表示已经搬迁到了新 map 的bucket x或是bucket y,新 map 的 tophash 则正常取 key 哈希值的高 8 位。
下面正式解读搬迁核心代码evacuate()函数。
evacuate()函数
1
2
3
4
5
6
7
8
9
10
11
12
13
14
15
16
17
18
19
20
21
22
23
24
25
26
27
28
29
30
31
32
33
34
35
36
37
38
39
40
41
42
43
44
45
46
47
48
49
50
51
52
53
54
55
56
57
58
59
60
61
62
63
64
65
66
67
68
69
70
71
72
73
74
75
76
77
78
79
80
81
82
83
84
85
86
87
88
89
90
91
92
93
94
95
96
97
98
99
100
101
102
103
104
105
106
107
108
109
110
111
112
113
114
115
116
117
118
119
120
121
122
123
124
125
126
127
128
129
130
131
132
133
134
135
136
137
138
139
140
141
142
143
144
145
146
147
148
149
150
151
152
153
154
155
156
157
158
func evacuate (t *maptype, h *hmap, oldbucket uintptr ) uintptr (t.bucketsize)))if !evacuated(b) {var xy [2 ]evacDst0 ]uintptr (t.bucketsize)))uintptr (t.keysize))if !h.sameSizeGrow() {1 ]uintptr (t.bucketsize)))uintptr (t.keysize))for ; b != nil ; b = b.overflow(t) {uintptr (t.keysize))for i := 0 ; i < bucketCnt; i, k, e = i+1 , add(k, uintptr (t.keysize)), add(e, uintptr (t.elemsize)) {if isEmpty(top) {continue if top < minTopHash {"bad map state" )if t.indirectkey() {var useY uint8 if !h.sameSizeGrow() {uintptr (h.hash0))if h.flags&iterator != 0 && !t.reflexivekey() && !t.key.equal(k2, k2) {1 else {if hash&newbit != 0 {1 if evacuatedX+1 != evacuatedY || evacuatedX^1 != evacuatedY {"bad evacuatedN" )if dst.i == bucketCnt {0 uintptr (t.keysize))-1 )] = topif t.indirectkey() {else {if t.indirectelem() {else {uintptr (t.keysize))uintptr (t.elemsize))if h.flags&oldIterator == 0 && t.bucket.ptrdata != 0 {uintptr (t.bucketsize))uintptr (t.bucketsize) - dataOffsetif oldbucket == h.nevacuate {func advanceEvacuationMark (h *hmap, t *maptype, newbit uintptr ) 1024 if stop > newbit {for h.nevacuate != stop && bucketEvacuated(t, h, h.nevacuate) {if h.nevacuate == newbit {nil if h.extra != nil {nil
代码比较长,但是文中注释已经比较清晰了,如果对map的扩容还不清楚,可以参见以下图解。
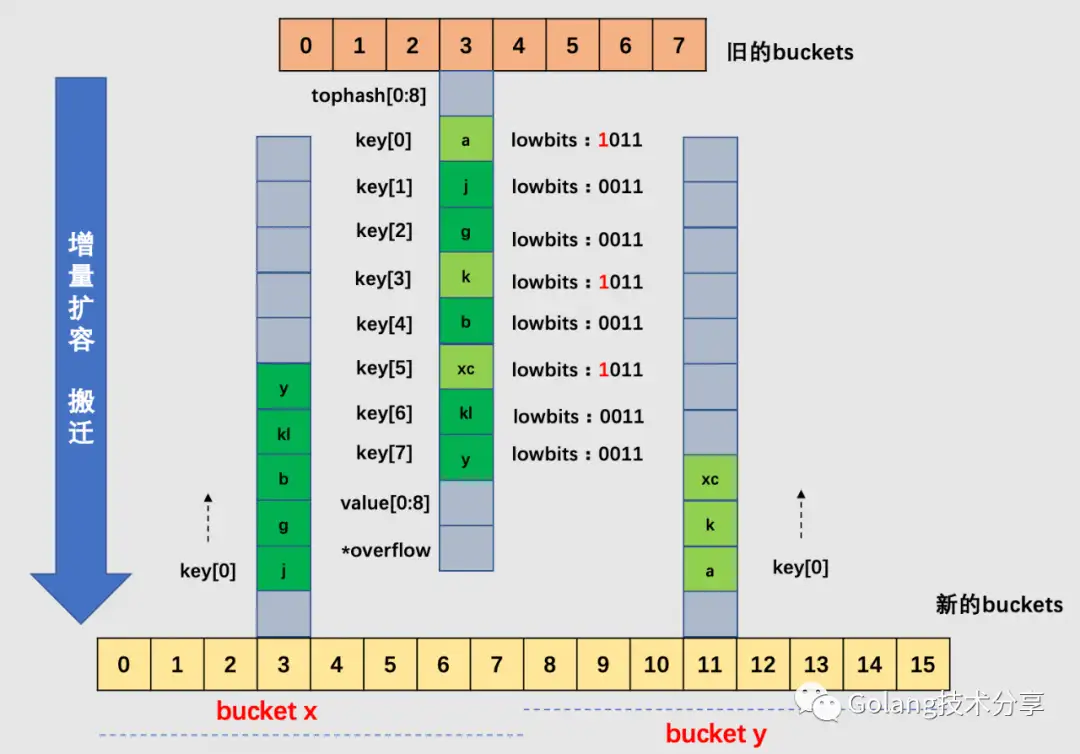
针对上图的map,其B为3,所以原始buckets数组为8。当map元素数变多,加载因子超过6.5,所以引起了增量扩容。
以3号bucket为例,可以看到,由于B值加1,所以在新选取桶时,需要取低4位哈希值,这样就会造成cell会被搬迁到新buckets数组中不同的桶(3号或11号桶)中去。注意,在一个桶中,搬迁cell的工作是有序的:它们是依序填进对应新桶的cell中去的。
当然,实际情况中3号桶很可能还有溢出桶,在这里为了简化绘图,假设3号桶没有溢出桶,如果有溢出桶,则相应地添加到新的3号桶和11号桶中即可,如果对应的3号和11号桶均装满,则给新的桶添加溢出桶来装载。
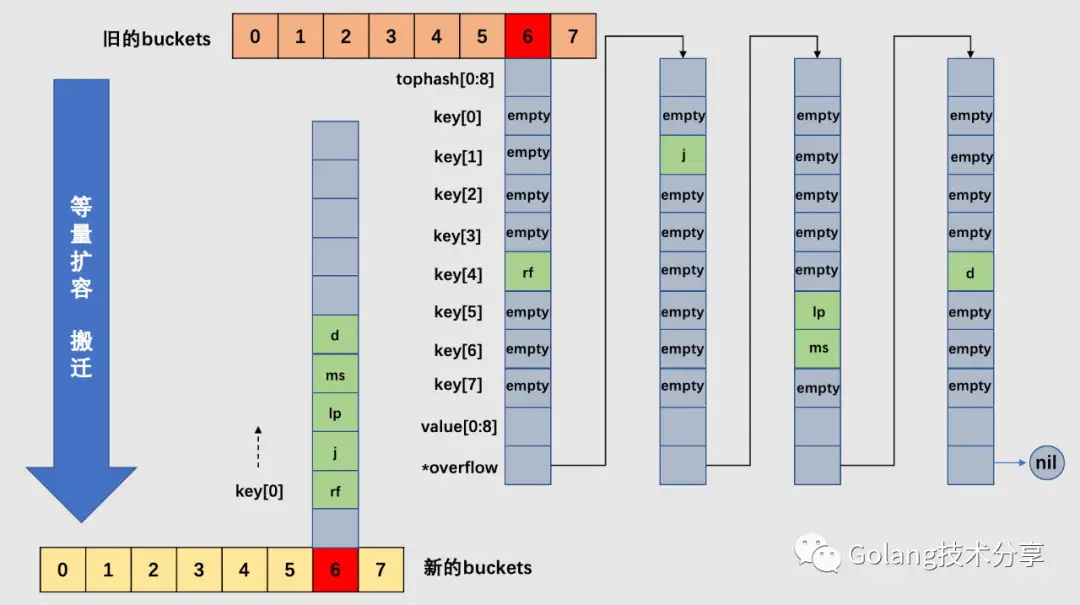
对于上图的map,其B也为3。假设整个map中的overflow过多,触发了等量扩容。注意,等量扩容时,新的buckets数组大小和旧buckets数组是一样的。
以6号桶为例,它有一个bucket和3个overflow buckets,但是我们能够发现桶里的数据非常稀疏,等量扩容的目的就是为了把松散的键值对重新排列一次,以使bucket的使用率更高,进而保证更快的存取。搬迁完毕后,新的6号桶中只有一个基础bucket,暂时并不需要溢出桶。这样,和原6号桶相比,数据变得紧密,使后续的数据存取变快。
